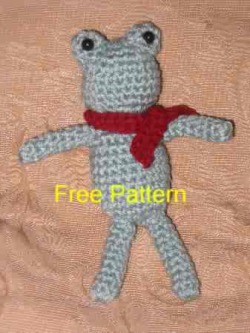
Bigger Frog
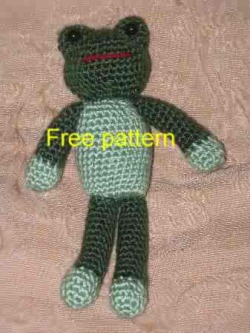
Bigger Frog
Frog measures about 9 ½ inches tall!
Supplies needed:
G Hook
Small amounts of WW yarn
Stitch marker or safety pin
Buttons for eyes (optional)
Terms used
Sc = single crochet
Sc-dec = single crochet decrease over 2 stitches
Ch = chain
FO = Finish off, or Fasten off
Please note!!!
The frog is done in a continous spiral.(unless other wise noted) I would suggest using a stitch marker or a safety pin to mark your place
Another tip: when you start the body, you will be working from the bottom up. If after a few rounds, there is holes in the bottom, you can use the beginning tail to sew them shut a bit
One of the easiest things to do, pin before sewing. I make up the entire head, and eyes first. Using sewing straight pins (or longer needles) pin the eyes onto the head. Make sure you like where they are first before sewing. Play around with the placement to see what you like. Do this will all your work. It will make a huge difference!
Head
Ch 2
1) 6 sc in 2nd chain from hook
2) 2 sc in each sc around (12 sc)
3) (2 sc in first sc, sc in next sc) repeat around (18 sc)
4) (2 sc in first sc, sc in next 2 sc) repeat around (24 sc)
5) (2 sc in first sc, sc in next 3 sc) repeat around (30 sc)
6) (2 sc in first sc, sc in next 4 sc) repeat around (36 sc)
7-10) sc in each sc around
11) (sc-dec, sc in next 3 sc’s) repeat around, sc in last sc (29 sc)
12) (sc-dec, sc in next 2 sc’s) repeat around, sc in last sc (22sc)
13) (sc-dec, sc in next sc) repeat around, sc in last sc (15 sc)
Slip stitch to the next sc,and FO leaving longer tail for sewing
Eyes (make 2)
Ch 2,
1) 4 sc in 2nd chain from hook.
2) 2 sc in each sc. (8 sc)
3) (2 sc in first sc, sc in next sc) repeat (12 sc)
4) sc in each sc around
Slip stitch to the next sc,and FO leaving longer tail for sewing
Sew buttons into eyes, pulling slightly. (this makes them indent a bit)
Sew eyes onto head.
Embroider on smile. (I simpy ran a small piece of yarn over a few stitches and tied the ends together inside the head.
Stuff head.
Body
Chain 5 with contrast yarn
1) 2 sc in 2nd chain from hook, sc in next 2 ch, 3 sc in last chain. Working along underside of chains, sc in next 2 sc, sc in last chain. (also is the first chain you 2 sc'd in) (10 sc)
2) 2 sc in each sc around (20 sc)
3) (2 sc in first sc, sc in next sc) repeat around (30 sc)
If after a few rounds, there is holes in the bottom, you can use the beginning tail to sew them shut a bit.
4-15) sc in each sc around
16) (sc-dec, sc in next 4 sc) (25 sc)
17) (sc-dec, sc in next 3 sc) (20 sc)
18) (sc-dec, sc in next 2 sc) (15 sc)
Slip stitch to next sc
FO
Stuff body
Sew body to head
Arms (make 2)
Chain 2 with contrast yarn
1) 5 sc in 2nd chain from hook
2) 2 sc in each sc around (10 sc)
3) (2 sc in first sc, sc in next sc) repeat around (15 sc)
4) sc in each sc around
5) (sc-dec, sc in next sc)
SWITCH to main color
6-16) sc in each sc around.
Around row 9 or so, it is easiest if you stuff bottom of arm (hand) firmly
After row 16, slp st to next sc
FO leaving long tail for sewing.
Stuff arm lightly
Sew arms to frog
Legs (make 2)
Chain 2 with contrast yarn
1) 5 sc in 2nd chain from hook
2) 2 sc in each sc around (10 sc)
3) (2 sc in first sc, sc in next sc) repeat around (15 sc)
4) sc in each sc around
5) (sc-dec, sc in next sc)
SWITCH to main color
6-18) sc in each sc around.
Around row 9 or so, it is easiest if you stuff bottom of leg (foot) firmly
After row 18, slp st to next sc
FO leaving long tail for sewing.
Stuff leg lightly
Sew legs to frog
You are done!
Enjoy!
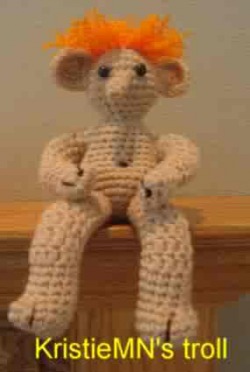
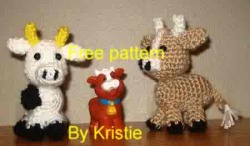
Ugly old troll
Head
Each round is joined with a slp st to the first stitch made.
Chain 5
1) 2 sc in 2nd chain from hook, sc in next 2 chains, 3 sc in last chain from hook. Working on underside of chain, sc in next 2 chains, sc in last chain (same as starting chain). Join with slp st (10 sc)
2) ch 1, 2 sc in each of first 2 sc, sc in next 2 sc, 2 sc in each of next 3 sc, sc in next 2 sc, 2 sc in last sc (16 sc)
3) ch 1, In BLO, 2 sc in first 2 sc, sc in next 5 sc, 2 sc in each of next 3 sc, sc in next 5 sc, 2 sc in last sc (22 sc)
4) ch 1, sc in each sc around.
5) ch 1, 2 sc in first 2 sc’s, sc in next 9 sc, 2 sc in next 2 sc, sc in last 9 sc. (26 sc)
6-8) ch 1, sc in each sc around
9) ch 1, (sc-dec, sc in next 4 sc) repeat around, sc-dec in last 2 sc (21 sc)
10) ch 1, (sc-dec, sc in next 3 sc) repeat around, sc in last sc (17 sc)
11) ch 1, (sc-dec, sc in next 2 sc) repeat around, sc in last sc (13 sc)
FO leaving long tail.
Stuff
Do not sew hole shut
Ears (make 2)
Ears are done in a continous spiral
Ch 2
1) 6 sc in 2nd chain from hook
2) 2 sc in each sc around (12 sc)
3) (2 sc in first sc, sc in next sc) repeat around (18 sc)
FO
Sew ears to each side of head
Nose
Nose is done in a continous spiral
Ch 2
1) 4 sc in 2nd chain from hook
2-4) sc in each sc around
FO
Sew nose to body.
Body
Body is done in a continous spiral
Ch 2
1) 6 sc in 2nd chain from hook
2) 2 sc in each sc around (12 sc)
3) (2 sc in first sc, sc in next sc) repeat around (18 sc)
4) (2 sc in first sc, sc in next 2 sc) repeat around (24 sc)
5) (2 sc in first sc, sc in next 3 sc) repeat around (30 sc)
6) (2 sc in first sc, sc in next 4 sc) repeat around (36 sc)
7-10) sc in each sc around
11) (sc-dec, sc in next 4 sc) repeat around (30 sc)
12) (sc-dec, sc in next 3 sc) repeat around (24 sc)
13-16) sc in each sc around
17) (sc-dec, sc in next 2 sc) repeat around (18 sc)
Stuff
18) (sc-dec, sc in next sc) repeat around (12 sc)
19) (sc-dec, sc in next sc) repeat around (8 sc)
FO
Stuff again
Do not sew hole shut.
Sew head to body
Foot/Leg (make 2)
Feet/legs are joined at the end of each round with a slp st to the first st made.
Ch 4
1) 2 sc in 2nd chain from hook, sc in middle chain, 3 sc in last chain from hook. Working along underside of chain, sc in bottom side of middle chain, sc in last chain. (same as first chain you started in) (8 sc)
2) ch 1, 2 sc in first sc, sc in next sc, 2 sc in next 3 sc’s, sc in next sc, 2 sc in last sc. (14 sc)
3) ch 1, 2 sc in first sc, sc in next 6 sc, 2 sc in next sc, sc in last 6 sc. (16 sc)
4) ch 1, sc in each sc around
5) ch 1, sc in first 7 sc, (sc-dec) twice, sc in last 5 sc (14 sc)
6) ch 1, sc in first 6 sc, (sc-dec)twice, sc in last 4 sc (12 sc)
7-9) ch 1, sc in each sc around
Stuff foot
10-14) ch 1, sc in first 5 stitches, hdc in next stitch, dc in next 4 stitches, hdc in next stitch, sc in last stitch.
15-18) ch 1, sc in each sc around
FO leaving long tail for sewing
Stuff, use stuffing to shape leg.
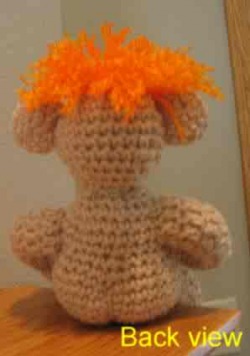
Sew legs to body so that they make him look like he is sitting down.
Using scrap yarn, run yarn through feet to look like toes. (optional)
Sculpt backside with a scrap piece of yarn. See picture for placement ideas. J
Hands/Arms (make 2)
Hands/arms are joined at the end of each round with a slp st to the first st made.
Ch 4
1) ) 2 sc in 2nd chain from hook, sc in middle chain, 3 sc in last chain from hook. Working along underside of chain, sc in bottom side of middle chain, sc in last chain. (same as first chain you started in) (8 sc)
2-4) ch 1, sc in each sc around
Stuff hands lightly
5) ch 1, (sc-dec) around (4 sc)
6) ch 1, 2 sc in each sc around (8 sc)
7-8) ch 1, sc in each sc around
9-10) ch 1, sc in first 2 sc, hdc in next stitch, dc in next 3 stitches, hdc in next stitch, sc in last sc.
11) ch 1, sc in first 2 sc, hdc in next hdc, dc in next dc, 3 dc in next dc, dc in next dc, hdc in hdc, sc in last sc.
12-14) ch 1, sc in first 2 sc, hdc in hdc, dc in next 5 dc, hdc in hdc, sc in last sc.
FO and stuff arm, using stuffing to help shape arm
Run a piece of scrap yarn through hands to resemble fingers, if desired.
Sew arms onto troll
Hair
You will need many pieces of yarn, cut into 5 inch pieces or so. Each piece of yarn will act as 2 strands of hair.
Insert hook into troll head at hair line. Use round 3 of troll head where you crocheted in BLO as a guide. I attached a strand of hair in the usused loop around his head, and filled in the middle. Grab middle of yarn strand with hook and pull through stitch, ( Like you would latch hook!) making a small loop. Pull both free ends of yarn strand through loop, pulling tight to secure hair.
You will continue to do this around the head.
Trim hair even in back, or as desired.
To give him a wavy look, (as pictured) I untwisted each strand of hair, and separated it. Tedious, but looks neat.
Another option, comb hair for a frizzy look.
Enjoy!
This is your new blog post. Click here and start typing, or drag in elements from the top bar.


 RSS Feed
