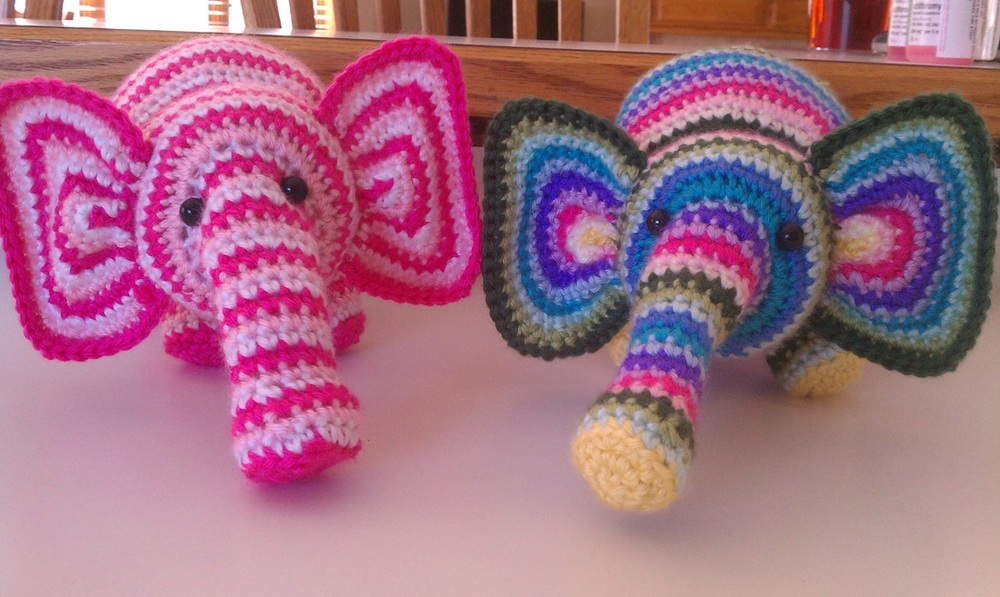
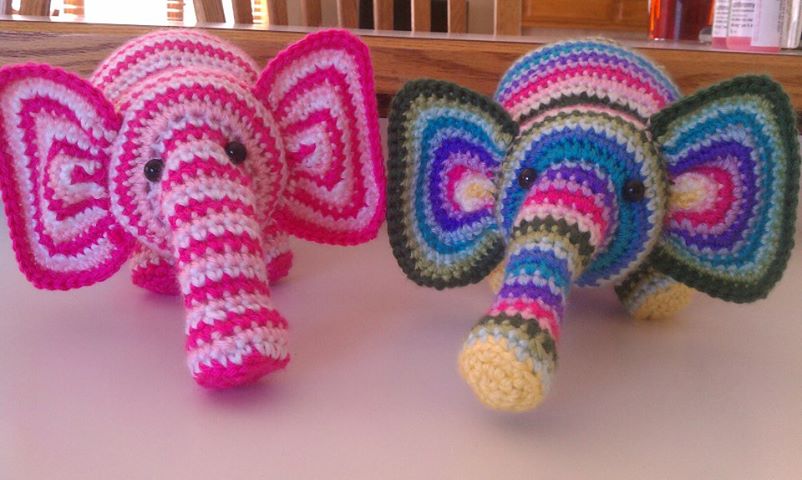
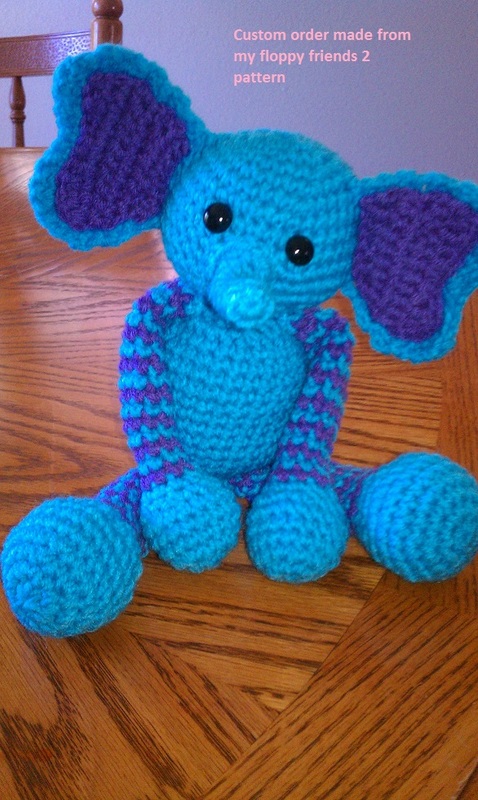
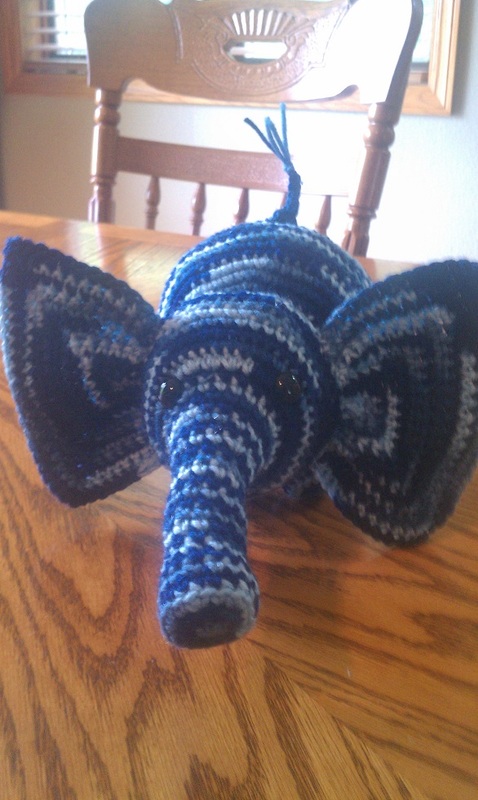
I found a picture similar on the internet...couldn't find a pattern..so I made up my own!
Supplies needed:
Less than a skein for main color if doing a solid color elephant
Buttons for eyes (or safety eyes)
Stuffing-fiberfill
Darning needle
F hook
Terms used:
Ch=chain
Sc= single crochet
BLO=back loops only
Sc-dec=single crochet decrease over 2 stitches
Elephant is worked in a continuous spiral. Use a stitch marker to mark each round end.
If you are going to change colors for each round, I would suggest you join each round end with a slip stitch, and ch 1 to begin next round changing color as you go
With F hook, and main color:
Starting at trunk and working towards rump of elephant
Ch 2
1) 6 sc in 2nd ch from hook (6 sc)
2) 2 sc in each ch around (12 Sc)
3) (2 sc in first sc, sc in next sc) repeat around (18 sc)
4) In BLO: sc in each sc around
Working in both loops now:
5) (sc-dec, sc in next 4 sc) repeat around (15 sc)
6) sc in each sc around
7) (sc-dec, sc in next 3 sc) repeat around (12 sc)
8-16) sc in each sc around
If you desire a longer trunk, add on extra rounds here, otherwise, continue on
17) (2 sc in first sc, sc in next 3 sc) repeat around (15 sc)
18-19) sc in each sc around
20) (2 sc in first sc, sc in next 4 sc) repeat around (18 sc)
21) sc in each sc around
22) (2 sc in first sc, sc in next 5 sc) repeat around (21 sc)
23) sc in each sc around
Trunk made, now onto the head
24) 2 sc in each sc around (42 sc)
25-33) sc in each sc around
34) (sc-dec, sc in next 4 sc) repeat around (35 sc)
35) (sc-dec, sc in next 3 sc) repeat around (28 sc)
36) (sc-dec, sc in next 2 sc) repeat around (21 sc)
37) sc in each sc around
Head made, now onto body
38) (2 sc, sc I next 2 sc) repeat around (28 sc)
39) (2 sc, sc I next 3 sc) repeat around (35 sc)
Stuff head and insert safety eyes if using them.
40) (2 sc, sc I next 4 sc) repeat around (42 sc)
41) (2 sc, sc I next 5 sc) repeat around (49 sc)
42) (2 sc, sc I next 6 sc) repeat around (56 sc)
43-53) sc in each sc around
54) (sc-dec, sc in next 6 sc) repeat around (49 sc)
55) (sc-dec, sc in next 5 sc) repeat around (42 sc)
56) (sc-dec, sc in next 4 sc) repeat around (35 sc)
57) (sc-dec, sc in next 3 sc) repeat around (28 sc)
58) (sc-dec, sc in next 2 sc) repeat around (21 sc)
Starting stuffing body now, continue to stuff as you finish the rump
59) (sc-dec, sc in next sc) repeat around (14 sc)
60) sc-dec around (7 sc)
FO and weave in end.
Ears (make 2)
Ch 3
1) sc in 2nd ch from hook and in last ch from hook. Ch1, turn
2) sc across, ch 1 turn
Next step, you will be working along side and bottom of square just made
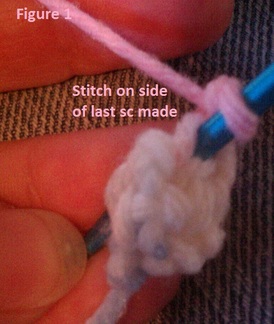
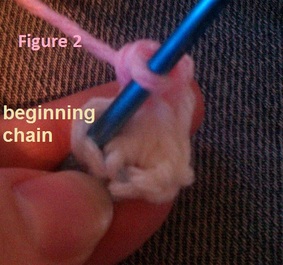
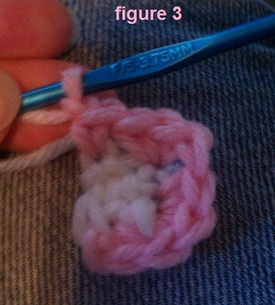
3) Sc on side of sc just made, (figure 1 pic) 3 sc in next stitch side (the beginning ch) (figure 2 pic) , 3 sc in next stitch, (this is the first ch made in your beginning chain 3), sc in side of next stitch. (this is the first sc you made on row 2) Ch I, turn. (figure 3 pic)
See pics for help!
Supplies needed:
Less than a skein for main color if doing a solid color elephant
Buttons for eyes (or safety eyes)
Stuffing-fiberfill
Darning needle
F hook
Terms used:
Ch=chain
Sc= single crochet
BLO=back loops only
Sc-dec=single crochet decrease over 2 stitches
Elephant is worked in a continuous spiral. Use a stitch marker to mark each round end.
If you are going to change colors for each round, I would suggest you join each round end with a slip stitch, and ch 1 to begin next round changing color as you go
With F hook, and main color:
Starting at trunk and working towards rump of elephant
Ch 2
1) 6 sc in 2nd ch from hook (6 sc)
2) 2 sc in each ch around (12 Sc)
3) (2 sc in first sc, sc in next sc) repeat around (18 sc)
4) In BLO: sc in each sc around
Working in both loops now:
5) (sc-dec, sc in next 4 sc) repeat around (15 sc)
6) sc in each sc around
7) (sc-dec, sc in next 3 sc) repeat around (12 sc)
8-16) sc in each sc around
If you desire a longer trunk, add on extra rounds here, otherwise, continue on
17) (2 sc in first sc, sc in next 3 sc) repeat around (15 sc)
18-19) sc in each sc around
20) (2 sc in first sc, sc in next 4 sc) repeat around (18 sc)
21) sc in each sc around
22) (2 sc in first sc, sc in next 5 sc) repeat around (21 sc)
23) sc in each sc around
Trunk made, now onto the head
24) 2 sc in each sc around (42 sc)
25-33) sc in each sc around
34) (sc-dec, sc in next 4 sc) repeat around (35 sc)
35) (sc-dec, sc in next 3 sc) repeat around (28 sc)
36) (sc-dec, sc in next 2 sc) repeat around (21 sc)
37) sc in each sc around
Head made, now onto body
38) (2 sc, sc I next 2 sc) repeat around (28 sc)
39) (2 sc, sc I next 3 sc) repeat around (35 sc)
Stuff head and insert safety eyes if using them.
40) (2 sc, sc I next 4 sc) repeat around (42 sc)
41) (2 sc, sc I next 5 sc) repeat around (49 sc)
42) (2 sc, sc I next 6 sc) repeat around (56 sc)
43-53) sc in each sc around
54) (sc-dec, sc in next 6 sc) repeat around (49 sc)
55) (sc-dec, sc in next 5 sc) repeat around (42 sc)
56) (sc-dec, sc in next 4 sc) repeat around (35 sc)
57) (sc-dec, sc in next 3 sc) repeat around (28 sc)
58) (sc-dec, sc in next 2 sc) repeat around (21 sc)
Starting stuffing body now, continue to stuff as you finish the rump
59) (sc-dec, sc in next sc) repeat around (14 sc)
60) sc-dec around (7 sc)
FO and weave in end.
Ears (make 2)
Ch 3
1) sc in 2nd ch from hook and in last ch from hook. Ch1, turn
2) sc across, ch 1 turn
Next step, you will be working along side and bottom of square just made
3) Sc on side of sc just made, (figure 1 pic) 3 sc in next stitch side (the beginning ch) (figure 2 pic) , 3 sc in next stitch, (this is the first ch made in your beginning chain 3), sc in side of next stitch. (this is the first sc you made on row 2) Ch I, turn. (figure 3 pic)
See pics for help!
You have now crocheted around the sides and bottom of row 3.
You are now going to be working only on the sides and bottom of row 3.
4) sc in next 2 sc, 3 sc in next sc (corner of ear being made), sc in next 2 sc, 3 sc I next sc, (2nd corner of ear made), sc in last 2 sc. Ch 1, turn. (12 sc)
5) sc in first 3 sc, 3 sc in next sc, sc in next 4 sc, 3 sc in next sc, sc in last 3 sc. Ch 1, turn, (16 sc) Your ear should look like the next picture

You will repeat this pattern increasing as you go for 7 more rows.
6) sc in 4 sc, 3 sc , then sc in 6 sc, 3 sc, then sc in 4 sc. Ch1, turn (20 sc)
7) sc in 5 sc, 3 sc , then sc in 8 sc, 3 sc, then sc in 5 sc. Ch1, turn (24 sc)
8) sc in 6 sc, 3 sc , then sc in 10 sc, 3 sc, then sc in 6 sc. Ch1, turn (28 sc)
9) sc in 7 sc, 3 sc , then sc in 12 sc, 3 sc, then sc in 7 sc. Ch1, turn (32 sc)
10) sc in 8 sc, 3 sc , then sc in 14 sc, 3 sc, then sc in 8 sc. Ch1, turn (36 sc)
11) sc in 9 sc, 3 sc , then sc in 16 sc, 3 sc, then sc in 9 sc.Ch1, turn (40 sc)\
12) sc in 10 sc, 3 sc then sc in 18 sc, 3 sc, then sc in 10 sc. Ch1, turn (44 sc)
FO leaving long tail for sewing
Weave in all ends EXCEPT for the long tail you left.
Take darning needle and thread on tail. You are going to weave the yarn through the bottom of the ear, and pull it in some. You can pull it tight, or have larger ears. I would recommend pulling it in, then holding it up to the elephant head to see how it looks. Run the yarn through a few stitches to secure. Use tail to sew to head of elephant.
Feet/legs (make 4)
Ch 2
1) 6 sc in 2nd ch from hook
2) 2 sc in each sc around
3) (2 sc in first sc, sc in next sc) repeat around (18 sc)
4) In BLO, sc in each sc around
5) (sc-dec, sc in next 4 sc) repeat around (15 sc)
6-7) sc in each sc around.
FO leaving longer tail for sewing.
Stuff lightly and sew to underside of elephant
Tail (make 1)
Ch 7,
Sc in 2nd ch from hook, and in each of the next 3 ch’s, sc in last 2 ch’s from hook.
FO
Sew to rump of tail.
Take 2 or 3 strands of scrap yarn and tie onto end of tail.
Snip ends of scrap yarn.
Elephant done!
email me with any questions at [email protected]


 RSS Feed
