Cupcake Critters
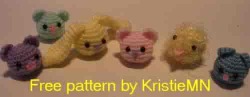
Cupcake Critters
Supplies needed:Small amounts of yarn. (ww yarn will make a bigger bear, baby yarn, a smaller bear
F hook for ww yarn,
Fiberfill
Stitch marker, or safety pin
Felt scrap for chick beak
Small buttons for eyes (optional)
Small cupcake papers (optional)
Terms used.
Sc = single crochet
Slp st = slip stitch
Sc-dec = single crochet decrease
FO =
Finish off
Please do not sell pattern. Feel free to sell completed items made from pattern.
Pattern is done in one continuous spiral, unless otherwise noted.
Main body/head
Ch 2
1) 6 sc in 2nd ch from hook
2) 2 sc in each sc around. (12 sc)
3) (2sc in next sc, sc in next sc) repeat around. (18 sc)
4) (2sc in next sc, sc in next 2 sc) repeat around. (24sc)
5-8) sc in each sc around.
9) (sc-dec, sc in next 2 sc) repeat around (18 sc)
10 (sc-dec, sc in next sc) repeat around (12 sc)
STUFF
11) sc-dec around (6 sc)
slp st to next sc
FO
Use tail end to sew hole shut
Teddy Bear
Follow main pattern for head/body.
Sew on, or embroider eyes.
Embroider on nose and mouth
Bear Ears (make 2)
Ch 3
1) sc in 2nd ch from hook, 3 sc in last sc, working on underside, sc in last ch of beginning ch 3 made (This is also the first ch you sc’d in) ch 1, turn. (5 sc)
2) sc in first sc, (2 sc in next sc, sc in next sc) twice. (7 sc)
FO
Use tail end to sew ear onto bear.
Bunny
Follow main pattern for body/head
Sew on or embroider eyes.
Embroider on nose and mouth.
Bunny Ears (make 2)
Ch 2
1) 4 sc in 2nd ch from hook
2) (2 sc in first sc, sc in next sc) twice (6 sc)
3) (2 sc in first sc, sc in next 2 sc) twice (8 sc)
4) (2 sc in first sc, sc in next 3 sc) twice (10 sc)
5) (2 sc in first sc, sc in next 4 sc) twice (12 sc)
6) (2 sc in first sc, sc in next 5 sc) twice (14 sc)
7-8) sc in each sc around
9) (sc-dec, sc in next 5 sc) twice (12 sc)
10) (sc-dec, sc in next 4 sc) twice (10 sc)
11) (sc-dec, sc in next 3 sc) twice (8 sc)
12-15) sc in each sc around
16) sc-dec around
Slp st to next sc,
FO
Use tail to sew to bunny head
Chick
Follow main pattern for head/body.
Cut a small diamond out of felt scrap.
Fold felt in half and sew middle to chick for beak.
Sew buttons or embroider eyes
A goofy looking cow
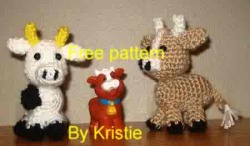
Hook size, F & G
(I used F hook for the black & white cow, and G hook for the brown cow)
Head
With main color
The end of each round is joined with a slip stitch to the first stitch made
Chain 2
1) 5 sc in 2nd chain from hook
2) ch 1, 2 sc in each chain around (10 sc)
3) ch 1, (2 sc in first sc, sc in next sc) repeat around (15 sc)
4) ch 1, (2 sc in first sc, sc in next 2 sc) repeat around (20 sc)
5-7) ch 1, sc in each sc around
8) ch 1, (2 sc in first sc, sc in next sc) repeat around (30 sc)
9) ch 1, sc in each sc around
10) ch 1, (sc dec, sc in next 2 sc) repeat around to last 2 sc, sc in last 2 sc (22sc)
11) ch 1, (sc dec, sc in next sc) repeat around to last sc, sc in last sc (15 sc)
STUFF
12) ch 1, (sc dec, sc in next sc) repeat around to last sc, sc in last sc (8 sc)
13) ch 1, sc dec around (4 sc)
FO leaving long tail to sew head to body.
Nose (with color of your choice)
Chain 4
1) 2 sc in 2nd ch from hook, sc in middle sc, 3 sc in last ch from hook. Working along back side of chain, sc in middle sc, sc in end sc. Join to first sc. (8 sc)
2) ch 1, 3 sc in first sc, sc in next 3 sc, 3 sc in next sc, sc in next 3 sc (12 sc)
FO leaving long tail to sew nose to head
Embroider snout and sew nose to head
Ears (make 2)
Rounds are not joined, this is one continuous spiral.
Chain2
1) 4 sc in 2nd chain from hook
2) ch 1, (2 sc in first sc, sc in next sc) repeat around (6 sc)
3) ch 1, sc in each sc
4) ch 1, (2 sc in first sc, sc in next sc) repeat around (9 sc)
5) ch 1, sc in each sc around, joint to next sc.
FO leaving tail
Fold ears in half lengthwise, and sew onto head as pictured
Horns (make 2)
Rounds are not joined, this is one continuous spiral
With color of your choice
Chain 2
1) 4 sc in 2nd chain from hook
2-4) sc in each sc around
FO leaving long tail.
Sew horns above ears on cows head
Body
The end of each round is joined with a slip stitch to the first stitch made
With main color:
Chain 4
1) 2 sc in 2nd ch from hook, sc in middle sc, 3 sc in last ch from hook. Working along back side of chain, sc in middle sc, sc in end sc. Join to first sc. (8 sc)
2) ch 1, 2 sc, in joining sc, 2 sc in next sc, sc in next sc, 2 sc in each of the next 3 sc, sc in next sc, 2 sc in last sc. (14 sc)
3) ch 1, 2 sc in joining sc, 2 sc in the next sc, sc in next 4 sc, 2 sc in each of next 3 sc, sc in next 4 sc, 2 sc in last sc. (20 sc)
4-10) ch 1, sc in each sc around.
11) ch 1, (sc dec, sc in next 2 sc) repeat around (15 sc)
STUFF
12) ch 1, (sc dec, sc in next sc) repeat around (10 sc)
STUFF a bit more
13) ch 1, sc dec around (5 sc)
DO NOT finish off, but instead chain 7
Slip stitch in 2nd chain from hook and each chain going back towards the body.
Slip stitch in first sc on body also.
FO leaving long tail.
Weave tail through sc around end hole and pull tight. Weave in any ends
For tail end:
Take 4 strands of yarn (hold all 4 together)
Pull middle of yarn sections through tail, not all the way, but enough to make a loop.
Take both ends of yarn, and pull through hoop you made. (like you would in latch hook)
Trim yarn to desired length
Legs (make 4)
For white cow,:
Using hoof color,
Chain 2
1) 6 sc in 2nd chain from hook
2) ch 1, sc in each sc around
FO and switch to main color
3-5) sc in each sc around
Finish off leaving long tail.
Sew legs to body
For brown cow:
With hoof color
Chain 2
1) 6 sc in 2nd chain from hook
FO and switch to main color
2-5) ch1, sc in each sc around
FO leaving long tail
Sew legs to body
Spots
Small spot:
Chain 4
1) 2 sc in n2nd chain from hook, sc in next chain, 3 sc in last chain, working in underside of chains, DC in middle chain, sc in last chain. Join
FO leaving tail long enough to sew spot onto cow.
I placed this spot on the side front of cow.
Sew into place.
Large spot:
Chain 4
1) 2 sc in 2nd chain from hook, sc in middle chain, 3 sc in end chain, working along underside of chains,sc in middle chian, sc in last chaing. Join
2) ch 1, 2 sc in first sc, dc in next 2 sc, sc in next sc, 2 dc in next sc, sc in next sc, dc in next sc, sc in last sc, Join.
FO leaving tail long enough to sew spot onto cow
I put this spot on the rear end of the cow.
Sew into place.
Enjoy your cow!
Tiny striped turtle

Tiny Striped Turtle
Supplies needed
:
F Hook
Small amounts of WW yarn
Stitch marker or safety pin
Buttons for eyes (optional)
Fiberfill
Terms used
Sc = single crochet
Sc-dec = single crochet decrease over 2 stitches
Ch = chain
BLO = back loops only
FO = Finish off, or Fasten off
Slp-st = slip stitch
You will need 2 colors to stripe the shell.
They will be referred to as color 1 = C1, and color 2 = C2.
Shell
Each round will end with a slp-st to the first sc made in that row.
With C1
Ch 2
1) 6 sc in 2nd ch from hook
C2
2) ch 1, 2 sc in each sc around (12 sc)
C1
3) ch 1, (2 sc in first sc, sc in next sc) repeat around (18 sc)
C2
4) ch 1, sc in each sc around
C1
5) ch 1, (2 sc in first sc, sc in next 2 sc) repeat around (24 sc)
C2
6) ch 1, sc in each sc around
C1
7) ch 1, (2 sc in first sc, sc in next 3 sc) repeat around (30 sc)
C2
8) ch 1, sc in each sc around
C1
9) ch 1, sc in each sc around, finish off C1 at end of this row
C2
10) ch 1, sc in each sc around
11) in BLO, ch 1, (sc-dec, sc in next 3 sc) repeat around (24 sc)
12) ch 1, (sc-dec, sc in next 2 sc) repeat around (18 sc)
STUFF
13) ch 1, (sc-dec, sc in next sc) repeat around (12 sc)
14) ch 1, sc-dec around (6 sc)
FO . Use tail to sew hole closed.
Head
Head is done in one continuous spiral.
Ch 2
1) 6 sc in 2nd ch from hook
2) 2 sc in each sc around (12 sc)
3) (2 sc in first sc, sc in next sc) repeat around (18 sc)
4) (2 sc in first sc, sc in next 2 sc) repeat around (24 sc)
5-7) sc in each sc around
8) (sc-dec, sc in next 2 sc) repeat around 18 sc
9) sc in each sc around
10) (sc-dec, sc in next sc) repeat around (12 sc)
slp st to next sc. FO, leaving long tail for sewing
Legs (make 4)
Legs are done in one continuous spiral
Ch 2,
1) 6 sc in 2nd ch from hook
2-3) sc in each sc around
Slp st to next sc. FO leaving long tail for sewing
Tail
Ch 4,
1) slp st in 2nd ch from hook, slp st in next ch, sc in last ch.
FO
Stuff and sew head to turtle body.
Sew legs on the underside of turtle.
Sew tail onto turtle tush.
Enjoy your turtle!!
This is your new blog post. Click here and start typing, or drag in elements from the top bar.
Smaller frog
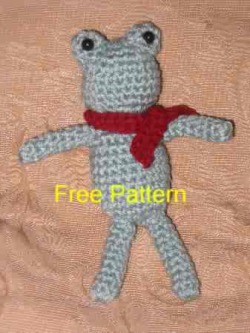
Small Frog
Frog measures about 7 inches tall!
Supplies needed:
G Hook
Small amounts of WW yarn
Stitch marker or safety pin
Buttons for eyes (optional)
Terms used
Sc = single crochet
Sc-dec = single crochet decrease over 2 stitches
Ch = chain
FO = Finish off, or Fasten off
Please note!!!
The frog is done in a continous spiral.(unless other wise noted) I would suggest using a stitch marker or a safety pin to mark your place
Another tip: when you start the body, you will be working from the bottom up. If after a few rounds, there is holes in the bottom, you can use the beginning tail to sew them shut a bit.
I get asked, why doesn’t my “ --------------†(fill in the blank) look like yours??
One of the easiest things to do, pin before sewing. I make up the entire head, and eyes first. Using sewing straight pins (or longer needles) pin the eyes onto the head. Make sure you like where they are first before sewing. Play around with the placement to see what you like. Do this will all your work. It will make a huge difference!
Head
Ch 2
1) 6 sc in 2nd chain from hook
2) 2 sc in each sc around (12 sc)
3) (2 sc in first sc, sc in next sc) repeat around (18 sc)
4) (2 sc in first sc, sc in next 2 sc) repeat around (24 sc)
5-8) sc in each sc around)
9) (sc-dec, sc in next 2 sc) repeat around (18 sc)
10) (sc dec, sc in next sc) repeat around (12 sc)
Slip stitch to the next sc
FO leaving long tail for sewing
Stuff head
Eyes (make 2)
Ch 2
1) 4 sc in 2nd chain from hook
2) 2 sc in each sc around (8 sc)
3) (2 sc in first sc, sc in next sc) repeat (12 sc)
FO leaving long tail.
Stuff beginning tail into each eye and sew to head. (Or stuff if you prefer)
Sew button to middle of eye, pulling threads tighter. This will make the button sink into the eye some. Alternate to button: embroider a French knot into each eye.
Body
Each round of body is joined. Join with slip stitch at end of each round
Ch 4
1) 2 sc in 2nd chain from hook, sc in middle chain, 3 sc in last chain from hook. Working along underside of chain, sc in bottom side of middle chain, sc in last chain. (same as first chain you started in) (8 sc)
2) ch 1, 2 sc in first sc, sc in next sc, 2 sc in next 3 sc’s, sc in next sc, 2 sc in last sc. (14 sc)
3) ch 1, 2 sc in first 3 sc, sc in next 3 sc, 2 sc in next 4 sc, sc in next 3 sc, 2 sc in last sc. (22 sc)
4-10) ch 1, sc in each sc around
11) ch 1, (sc-dec, sc in next 3 sc) repeat around, sc in last 2 sc’s (17 sc)
12) ch 1, (sc-dec, sc in next 2 sc) repeat around. Sc in last sc. (13 sc)
STUFF
13) ch 1, (sc-dec, sc in next sc) repeat around. Sc in last sc (9 sc)
FO
Sew head onto body overlapping head a bit over the body.
Arms (make 2)
(Back to crocheting in a spiral)
Ch 2
1) 6 sc in 2nd chain from hook
2-9) sc in each sc around
Slip stitch to the next sc,and FO leaving longer tail for sewing
Note: after round 2, make sure to flip arm so you are crocheting on the outside of arm... It is too difficult to do it once your arms are completed. No need to stuff.
Sew arms onto Frog
Legs (make 2)
Ch 2
1) 6 sc in 2nd chain from hook
2-10) sc in each sc around
Slip stitch to the next sc,and FO leaving longer tail for sewing
Note: after round 2, make sure to flip leg so you are crocheting on the outside of arm... It is too difficult to do it once your arms are completed. No need to stuff.
Sew legs onto frog
Scarf
Chain 35
1) sc in 2nd chain from hook & each remaining chain.
FO
Tack or tie scarf around frog neck.
Frog complete!
 RSS Feed
