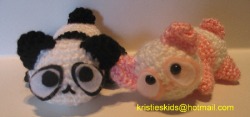
Lazy Pandas
The pandas measure 4 inches long, and are 2 inches high.
Supplies needed:
Ww yarn, 2 different colors
Felt, 2 different colors to match yarn
Doll eyes, (optional, you can use felt too)
Stuffing
F hook
Stitch marker
Terms used”
Ch = chain
FO = finish off
Sc = single crochet
Sc-dec = single crochet decrease, done over 2 stitches
Slp st = slip stitch
Head
With white
Ch 5
1) 2 sc in 2nd ch from hook, sc in next 2 ch’s, 3 sc in last ch from hook, working on underside of beginning ch, sc in next 2 ch’s,(the middle 2), sc in last ch, (this is the first ch you 2 sc’d into) Join to first sc made with slp st. You should now have 10 sc, in the shape of an oval
2) ch 1, 2 sc in each of first 2 sc, sc in next 2 sc, 2 sc in each of next 3 sc, sc in next 2 sc, 2 sc in last sc. Join (16 sc)
3) ch 1, (sc in first sc, 2 sc in next sc) repeat around. Join. (24 sc)
4-8) ch 1, sc in each sc around.
9) ch 1, (Sc-dec, sc in next 2 sc) repeat around. Join (18 sc)
10) ch 1, (Sc-dec, sc in next sc) repeat around. Join (12 sc)
Stuff head
11) ch 1, Sc-dec, around Join. (6 sc)
FO. Use tail to sew hole on bottom of head shut.
Ears (make 2)
Ears are done in one continuous spiral. Use stitch marker if needed
With black,
Ch 2
1) 5 sc in 2nd ch from hook
2) 2 sc in each sc around. (10 sc)
3-4) sc in each sc around
Slp st to next sc
FO leaving longer tail for sewing.
Fold ears flat and curve slightly in.
Sew ears to each side of head. (see end note)
Body
Starting with white yarn,
Ch 4
1) 2 sc in 2nd ch from hook, sc in next ch, 3 sc in last ch from hook, working on underside of beginning ch, sc in next ch,(the middle ch), sc in last ch, (this is the first ch you 2 sc’d into) Join to first sc made with slp st. You should now have 8 sc, in the shape of an oval.
2) ch 1, 2 sc in each of first 2 sc, sc in next sc, 2 sc in each of next 3 sc, sc in next sc, 2 sc in last sc. Join, (14 sc)
3) Ch 1, (sc in first sc, 2 sc in next sc) repeat around. Join. (21 sc)
Next row forms the ‘rump hump’
4) Ch 1, sc in first 2 sc, (2 sc in next sc, sc in next) repeat 4 MORE times, sc in remaining 9 sc. Join. (67 sc)
5-7) Ch 1, sc in each sc around. Join.
8) Ch 1, sc in first 2 sc, (sc-dec, sc in next sc) repeat 4 MORE times, sc in last 9 sc. Join. (21 sc)
Change to black yarn. (or contrast color)
9-11) Ch 1, sc in each sc around
12) Ch 1, (Sc-dec, sc in next 5 sc) repeat around. Join. (18 sc)
13) Ch 1, (Sc-dec, sc in next 4 sc) repeat around. Join. (15 sc)
FO leaving long tail.
Stuff body. Push a bit of extra stuffing into rump hump. Make sure rump hump is facing upwards when you sew to head.
Sew body to back side of head. This will make the panda appear to be laying down. See end notes.
Arms/Legs (make 4)
Arms/legs are done in one continuous spiral, use stitch marker if needed. See note at end about stuffing arms/legs
With black/contrast color
Ch 2
1) 4 sc in 2nd ch from hook
2) (2 sc in first sc, sc in next) repeat once. (6 sc)
3) (2 sc in first sc, sc in next 2 sc) repeat once. (8 sc)
4) (2 sc in first sc, sc in next 3 sc) repeat once. (10 sc)
5) (2 sc in first sc, sc in next 4 sc) repeat once. (12 sc)
Slp st to next sc
FO leaving long tail.
Stuff and sew onto panda body
Tail
With black/contrast color
Ch 5
1) 5 sc in 2nd ch from hook
2) 2 sc in each sc around. (10 sc)
3-) sc in each sc around
Slp st to next sc
FO leaving long tail.
Fold tail flat, and curve slightly in.
Sew tail to rump hump. J
Eye patches are done in felt. You may need to experiment with different sizes of pieces to figure out what looks good.
I cut the felt to look like ovals. Black being the biggest oval, white being a bit smaller. The actual eye can be made from felt, or use a button if preferred. Keep in mind, it maybe a bit difficult to sew the eye on, going through the glue from the eye patches.
Note about panda:
The panda is made in pieces, and assembled to look like he is laying flat on the ground. The body is sewn directly to the back side of the head. Make sure to line up so the head, body, arms/legs all sit on the flat surface.
The easiest way to stuff the arms and legs… start with a long tail before chaining 2. Use this tail to stuff inside the arms/legs. This way, white stuffing doesn’t show through.
You may find it helpful (I do) to pin on body parts before sewing or gluing. This way you can get the placement to your satisfaction.
This is your new blog post. Click here and start typing, or drag in elements from the top bar.
 RSS Feed
